Subjectivity and personal preference are the two greatest adversaries to developing the ‘best’ stain. The personal preference from one pathologist to another is rarely the same, and the more pathologists you have involved in the decision-making, the more challenging optimization becomes. While technologists are trained in how to optimize the H&E stain based on the balance of coloration, the pathologist is making the diagnosis. The histologist’s goal is to provide them with the tools they need to facilitate the use of their diagnostic competencies. One pathologist will prefer very dark and rich nuclear staining, particularly those T & B cell clinicians, and another pathologist will prefer a bright orangish-red counterstain, even to the point of overwhelming the nuclear stain. Optimization is subject to the preference of the pathologist. Our goal as part of the diagnostic process is to satisfy that need.
With this in mind, in your development process, it is important to set up repetitive staining trials where you can perform minor adjustments to the core stain and differentiation steps. With each run, you will perform the same early steps of your staining run, i.e., deparaffinization to water, but you will make minor adjustments to the core steps of nuclear staining, differentiation, bluing, and counterstaining. Note the Slide-Match staining trials chart to the right. The Standard Protocol is your present protocol used. With each staining run, you will focus on adjusting the variables in the blue sections only. The chart can be extended to as many stain trials as necessary (ST-3, ST-4, etc.). You should be able to finalize the ‘best’ stain within 3-5 trial runs. This is just an example that could be used as a template. It is advisable to use a Multi-Tissue Control slide in your trials; one that has various tissues that will exhibit both good strong nuclear staining as well as differential counterstaining. Once a protocol run has been selected and approved by the pathologist and validated by the lab, you are now ready to move on towards quality assurance.


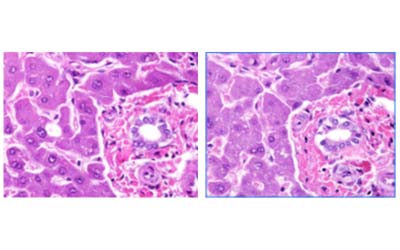
However, high volume staining labs performing 500, 700, 1,000+ slides per day most likely will have to make rotations and/or changes to the deparaffinization steps as well as the nuclear, differentiation, and counterstaining steps. It all depends on your volume and the dye reagents used. Eosin staining is a good example of one of the stains that will break down more frequently. As more slides are introduced into the Eosin dye (which is at an optimal pH of about 4.3), residual water (which is at a pH of about 7.5) will eventually raise the Eosin pH out of its optimal range (above 5.0). The two images above demonstrate the kind of subtle difference in intensity that can be expected from a slide at the beginning of your staining day (left image), to the intensity that will be seen at the end of your staining day (right image) if adjustments aren’t made. The higher pH on the right demonstrates a paler stain with less depth and intensity from the nuclear and cytoplasmic staining. Each laboratory should investigate this by first taking a Multi-Tissue Control block (MTC) and running a slide at the beginning of the day’s run, and another one at the end of the day. The various tissues of the MTC in the first and last control slide should give you a lot of information on the lifespan of your reagents and dyes.
A daily Q.C. sheet should be maintained to show all reagents, dyes, and the frequency of changes or refreshes that are done, even if they are only put in fresh at the beginning or end of the day. Oversight and accountability for not maintaining this on a daily basis will ensure consistency from the beginning of the day until the end, and reproducibility of the decidedly ‘best’ stain quality.
The information given in the three segments of this series on H&E staining should give the laboratorian a better technical understanding of the components, demonstrate how to develop the stain your pathologist prefers, and how to deliver it with day-to-day confidence. The process will be tedious at first but will guarantee success and bring less headaches requiring troubleshooting.
References:
- Brown, S., “Developing & Validating Multi-Tissue Control Blocks”, Workshop in Technical Development Series, Lab Management Consultants, 2020
- Brown, S., “The Science & Application of H&E Staining”, Workshop in Technical Develop Series, Lab Management Consultants, 2011.
- Brown, S., “A Systems Approach to H&E Staining”, Workshop presentation, National Society for Histotechnology Symposium, 2013.
- Hansen, S., Images in H&E Staining, LBS, 2011.